Two different methods are used for the installation of the Tp link Extender device. Considering that you have come to this page to learn how to install the device, we will first explain the installation with the simple WPS mode, and then move on to the other installation done via the web browser. Let’s list the processes you need to check;
- Make sure your router and wifi network are working.
- Bring your TP Link wifi extender near your router. After installation, you will take it to your home or workplace where the wifi signal is low, but not now after installation.
How to setup Tp Link Extender via WPS Button
Step 1) Bring your range extender device near your router and plug it in. First, turn on your router’s WPS mode. Then press the WPS button of the Wifi booster device. You should do this within 2 minutes. If you can’t, you have to repeat from the beginning. You have to do the pairing within 2 minutes.When you press the WPS button, the light on the device should flash. Keep in mind, if there is a connection or pairing between 2 devices in technological devices, the LED light will flash.
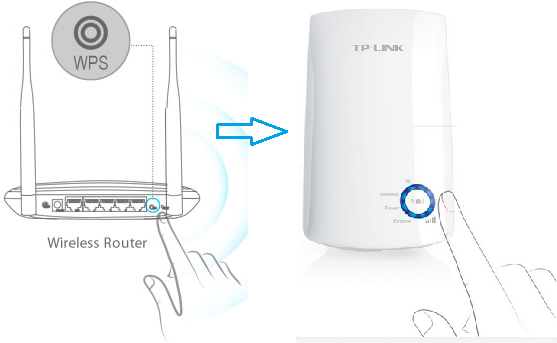
The connection process with WPS will be completed in 2 minutes. If the LED light is off, it means that the connection could not be made. Try again from the beginning.
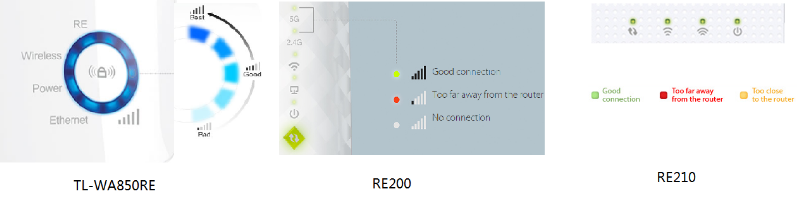
Important Note: Now we come to the important part, positioning the device after the connection is the most important detail. You should put it at the nearest place you need in your home or workplace, at the same time, this place should receive enough wifi signal from the router. If the wifi booster device cannot receive the signal sufficiently, it cannot amplify it and becomes ineffective. Therefore, take the TP link extender device in your hand and move away from the router according to the wifi signal strength from the LED device on it. When you come to the dead areas in the house, make sure that the wifi signal comes from the router, even if it is a little, and place the range extender device here.
How to Setup TP LINK Wifi Range Extender
Step 1) The ip address we enter in the range extender user interface must be in the same root directory as the main router ip address. Usually the ip addresses used for login are 192.168.0.254 and 192.168.1.254. Username and password are both “admin”.

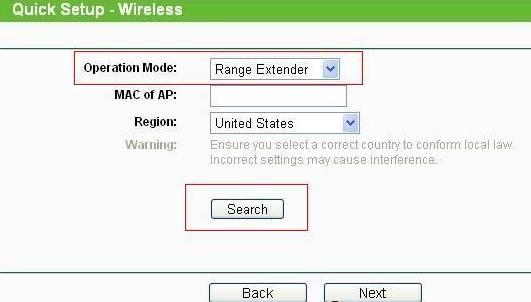
Step 2) Click Quick Setup. Then, click Next > Wireless. Select Range Extender as the Operation Mode. Then click Search. After this section, you will see a list, find the SSID network name of your device and click CONNECT.
Connection completed successfully. Now the device will reboot itself by rebooting and you can use it this way. Wifi security settings are the same as the router. In other words, it is important for the extender to comply with the wifi security rules, since the wifi network name and password are the same as the router and the extender device. Some extender devices also require a pin code as extra security in WPS modes.
How to reset TP Link Extender
Resetting the device to factory settings is usually the last solution to the problem. If your device has slow connection and performance problems, the updated version of the firmware should be installed first. If the problems are not resolved, the last resort should be reset to factory settings.
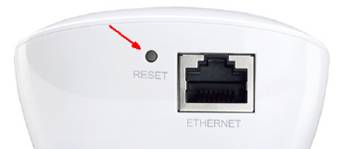
To reset, we press the hole on the back of the device for 2 seconds with a thin-tipped stick. If the LED lights on the extender are flashing, it means that the reset process has been completed.
The login information required to re-install after the reset is the default ip address, user name and password as we used in the first installation. You can also see them on the label on the back of the device.
Over road district smithville p.o clarendon